MiddleWare-Redis共享Session
在微服务架构中,往往由多个微服务共同支撑前端请求,如果涉及到用户状态就需要考虑分布式 Session 管理理问题,比如用户登录请求分发在服务器 A,用户购买请求分发到了服务器 B, 那么服务器就必须可以获取到用户的登录信息,否则就会影响正常交易。因此,在分布式架构或微服务架构下,必须保证一个应用服务器上保存 Session 后,其他应用服务器可以同步或共享这个 Session。
目前主流的分布式 Session 管理有两种方案。
Session 复制
部分 Web 服务器能够支持 Session 复制功能,如 Tomcat。用户可以通过修改 Web 服务器的配置文件,让Web 服务器进行 Session 复制,保持每一个服务器节点的 Session 数据都能达到一致。 这种方案的实现依赖于 Web 服务器,需要 Web 服务器有 Session 复制功能。当 Web 应用中 Session 数量较多的时候,每个服务器节点都需要有一部分内存用来存放 Session,将会占用大量内存资源。同时大量的Session 对象通过网络传输进行复制,不但占用了了网络资源,还会因为复制同步出现延迟,导致程序运行错误。
在微服务架构中,往往需要 N 个服务端来共同支持服务,不建议采用这种⽅方案。
Session 集中存储
在单独的服务器或服务器集群上使用缓存技术,如 Redis 存储 Session 数据,集中管理所有的 Session,所有的 Web 服务器都从这个存储介质中存取对应的 Session,实现 Session 共享。将 Session 信息从应用中 剥离出来后,其实就达到了了服务的无状态化,这样就方便在业务极速发展时水平扩充。
在微服务架构下,推荐采用此方案,接下来详细介绍。
Session 共享
什么是 Session
由于 HTTP 协议是无状态的协议,因而服务端需要记录用户的状态时,就需要用某种机制来识具体的用户。Session 是另⼀一种记录客户状态的机制,不同的是 Cookie 保存在客户端浏览器中,而 Session 保存在服务器上。客户端浏览器访问服务器的时候,服务器把客户端信息以某种形式记录在服务器上,这就是 Session。客户端浏览器再次访问时只需要从该 Session 中查找该客户的状态就可以了了。
为什么需要 Session 共享
在互联网⾏行行业中用户量访问巨大,往往需要多个节点共同对外提供某一种服务,如下图:
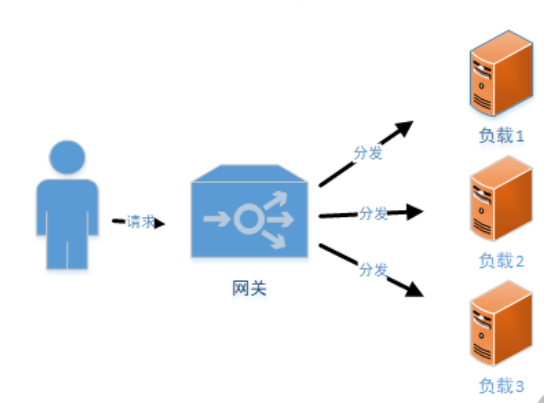
用户的请求首先会到达前置网关,前置网关根据路由策略将请求分发到后端的服务器,这就会出现第一次的请求会交给服务器 A 处理,下次的请求可能会是服务 B 处理,如果不做 Session 共享的话,就有可能出现用户在服务 A 登录了了,下次请求的时候到达服务 B ⼜又要求用户重新登录。
前置网关我们⼀一般使用 lvs、Nginx 或者 F5 等软硬件,有些软件可以指定策略让用户每次请求都分发到同⼀台服务器中,这也有个弊端,如果当其中一台服务 Down 掉之后,就会出现一批用户交易失效。在实际工作中我们建议使用外部的缓存设备来共享 Session,避免单个节点挂掉而影响服务,使用外部缓存 Session后,我们的共享数据都会放到外部缓存容器中,服务本身就会变成无状态的服务,可以随意的根据流量的⼤小增加或者减少负载的设备。
Spring 官⽅方针对 Session 管理这个问题,提供了专门的组件 Spring Session,使用 Spring Session 在项目中集成分布式Session非常方便。
Spring Session
Spring Session 提供了一套创建和管理 Servlet HttpSession 的⽅方案。Spring Session 提供了了集群 Session(Clustered Sessions)功能,默认采⽤用外置的 Redis 来存储 Session 数据,以此来解决 Session 共 享的问题。
Spring Session 为企业级 Java 应用的 Session 管理带来了了革新,使得以下的功能更加容易实现:
-
API 和用于管理用户会话的实现;
- HttpSession,允许以应⽤用程序容器(即 Tomcat)中性的方式替换 HttpSession;
- 将 Session 所保存的状态卸载到特定的外部 Session 存储中,如 Redis 或 Apache Geode 中,它们能 够以独立于应用服务器的方式提供高质量的集群;
- 支持每个浏览器上使用多个 Session,从而能够很容易地构建更加丰富的终端用户体验;
- 控制 Session ID 如何在客户端和服务器之间进行行交换,这样的话就能很容易地编写 Restful API,因为 它可以从 HTTP 头信息中获取 Session ID,而不必再依赖于 cookie;
- 当⽤用户使用 WebSocket 发送请求的时候,能够保持 HttpSession 处于活跃状态。
需要说明的很重要的一点就是,Spring Session 的核⼼心项目并不依赖于 Spring 框架,因此,我们甚至能够将其应用于不使用 Spring 框架的项目中。
Spring 为 Spring Session 和 Redis 的集成提供了了组件:spring-session-data-redis,接下来演示如何使用。
快速集成
引入依赖包
1
2
3
4
<dependency>
   <groupId>org.springframework.session</groupId>
   <artifactId>spring-session-data-redis</artifactId>
</dependency>
添加配置文件
1
2
3
4
5
6
7
8
9
10
11
12
13
14
15
16
17
18
19
20
21
22
23
24
25
26
27
28
29
30
31
32
33
34
# 数据库配置
spring:
  datasource:
    url: jdbc:mysql://xxxxxxx
    driver-class-name: com.mysql.cj.jdbc.Driver
    username: ********
    password: ********
# JPA 配置
  jpa:
    properties:
      hibernate:
        hbm2ddl:
          auto: update
        dialect: org.hibernate.dialect.MySQL5InnoDBDialect
    show-sql: true
# Redis 配置
  redis:
  # Redis数据库索引(默认为0)
    database: 3
  # Redis服务器地址
    host: x.x.x.x
  # Redis服务器连接端口
    port: 6379
  # Redis服务器连接密码(默认为空)
    password:
    lettuce:
      pool:
        max-active: 8
        max-wait: -1
        max-idle: 8
        min-idle: 0
      shutdown-timeout: 100
整体配置分为三块: 数据库配置、JPA配置、Redis配置
在项目中创建SessionConfig类,使用注解配置器过期时间
SessionConfig.java
1
2
3
4
5
6
7
8
9
10
11
package top.withlevi.config;

import org.springframework.context.annotation.Configuration;
import org.springframework.session.data.redis.config.annotation.web.http.EnableRedisHttpSession;

@Configuration
@EnableRedisHttpSession(maxInactiveIntervalInSeconds = 86400 * 30)
public class SessionConfig {

}
maxInactiveIntervalInSeconds: 配置Session失效时间,使用Redis Session之后,原Spring Boot中的server.session.timeout 属性
需要这两步Spring Boot 分布式 Session 就配置完成了。
测试验证
首先我们要编写RedisConfig, 为了防止在存写的时候key-value的时候乱码
1
2
3
4
5
6
7
8
9
10
11
12
13
14
15
16
17
18
19
20
21
22
23
24
25
26
27
28
29
30
31
32
33
34
35
package top.withlevi.config;

import org.springframework.cache.annotation.EnableCaching;
import org.springframework.context.annotation.Bean;
import org.springframework.context.annotation.Configuration;
import org.springframework.data.redis.connection.RedisConnectionFactory;
import org.springframework.data.redis.core.RedisTemplate;
import org.springframework.data.redis.serializer.Jackson2JsonRedisSerializer;
import org.springframework.data.redis.serializer.StringRedisSerializer;

@Configuration
@EnableCaching
public class RedisConfig {
    /**
     * 配置自定义redisTemplate
     * @return
     */
    @Bean
    RedisTemplate<String, Object> redisTemplate(RedisConnectionFactory redisConnectionFactory) {

        RedisTemplate<String, Object> redisTemplate = new RedisTemplate<>();
        redisTemplate.setConnectionFactory(redisConnectionFactory);
        Jackson2JsonRedisSerializer jackson2JsonRedisSerializer = new Jackson2JsonRedisSerializer(Object.class);
        // 设置值(value)的序列化采用Jackson2JsonRedisSerializer。
        redisTemplate.setValueSerializer(jackson2JsonRedisSerializer);
        // 设置键(key)的序列化采用StringRedisSerializer。
        redisTemplate.setKeySerializer(new StringRedisSerializer());
        redisTemplate.setHashKeySerializer(new StringRedisSerializer());

        redisTemplate.afterPropertiesSet();
        return redisTemplate;
    }

}
然后再编写Web层写两个方法进行验证
1
2
3
4
5
6
7
8
9
10
11
12
13
14
15
16
17
18
19
20
21
22
23
24
25
26
27
28
29
30
31
32
33
34
35
36
37
38
39
40
41
42
43
44
45
46
47
package top.withlevi.controller;

import org.springframework.web.bind.annotation.RequestMapping;
import org.springframework.web.bind.annotation.RestController;
import top.withlevi.model.User;
import top.withlevi.repository.UserRepository;

import javax.annotation.Resource;
import javax.servlet.http.HttpServletRequest;
import java.util.HashMap;
import java.util.Map;

/**
 * Created by Levi Zhao on 7/18/2023 9:39 AM
 *
 * @Author Levi
 */

@RestController
public class SessionController {

    @Resource
    private UserRepository userRepository;


    @RequestMapping(value = "/setSession")
    public Map<String, Object> setSession(HttpServletRequest request) {
        Map<String, Object> map = new HashMap<>();
        request.getSession().setAttribute("message", request.getRequestURL());
        map.put("request Url ", request.getRequestURL());
        return map;

    }


    @RequestMapping(value = "/getSession")
    public Object getSession(HttpServletRequest request) {
        Map<String, Object> map = new HashMap<>();
        map.put("sessionId", request.getSession().getId());
        map.put("message", request.getSession().getAttribute("message"));
        return map;
    }


}
在请求setSession的地址的时候,并把请求地址存放到Key为message的Session中,同事结果返回页面。
在请求getSession的地址的时候,获取Session中的Session Id 和Key为message的信息,将获取到的信息封装到Map中并在页面展示。
在进行测试之前我们需要需要上述的步骤在创建另外一个spring-boot-redis-session项目,并在yaml配置文件中把启动端口改为:9090
1
2
server:
	port: 9090
修改完成后依次启动这两个项目。
首先访问8080端口的服务,浏览器输入网址
1
http://localhost:8080/setSession
页面返回的信息如下:
1
{"request Url ":"http://localhost:8080/setSession"}
然后在浏览器中输入以下网址
1
http://localhost:8080/getSession
页面返回的信息如下:
1
{"sessionId":"5ab6402b-bd34-4358-8533-379f4be65e96","message":"http://localhost:8080/setSession"}
说明Url地址信息已经存放到Session中。
然后访问9090端口的服务,浏览器输入网址:
1
http://localhost:9090/getSession
页面返回的信息如下:
1
{"sessionId":"5ab6402b-bd34-4358-8533-379f4be65e96","message":"http://localhost:8080/setSession"}
通过对比发现,8080端口的服务和9090端口的服务返回的Session信息完全一致,说明已经实现了Session共享
模拟登录
在实际中作中常使用共享 Session 的方式去保存用户的登录状态,避免用户在不同的页面多次登录。我们来简单模拟一下这个场景,假设有一个 index 页面,必须是登录的用户才可以访问,如果用户没有登录给出请登录的提示。在一台实例上登录后,再次访问另外一台的 index 看它是否需要再次登录,来验证统一登录是否成功。
添加登录方法,登录成功后将用户信息存放到 Session 中
先创建User
1
2
3
4
5
6
7
8
9
10
11
12
13
14
15
16
17
18
19
20
21
22
23
24
25
26
27
28
29
30
31
32
33
34
35
36
37
38
39
package top.withlevi.model;

import lombok.AllArgsConstructor;
import lombok.Data;
import lombok.NoArgsConstructor;

import javax.persistence.*;
import java.io.Serializable;

@Entity
@Data
@NoArgsConstructor
@AllArgsConstructor
@Table(name = "user")
public class User implements Serializable {

    private static final long serialVersionUID = 1L;

    @Id
    @GeneratedValue
    private Long id;

    @Column(nullable = false, unique = true)
    private String userName;

    @Column(nullable = false)
    private String password;

    @Column(nullable = false, unique = true)
    private String email;

    @Column(nullable = false)
    private String nickname;

    @Column(nullable = false)
    private String regTime;


}
然后创建repository
1
2
3
4
5
6
7
8
9
10
11
12
13
package top.withlevi.repository;

import org.springframework.data.jpa.repository.JpaRepository;
import org.springframework.stereotype.Repository;
import top.withlevi.model.User;

@Repository
public interface UserRepository extends JpaRepository<User, Long> {

    User findByUserName(String userName);

}
最后在Web层进行完善
1
2
3
4
5
6
7
8
9
10
11
12
13
14
15
16
17
18
19
20
21
22
23
24
25
26
27
28
29
30
31
32
33
34
35
36
37
38
39
40
41
42
43
44
45
46
47
48
49
50
51
52
53
54
55
56
57
58
59
60
61
62
63
64
65
66
67
68
69
70
71
72
73
74
75
76
77
78
79
80
81
82
83
84
85
86
87
88
89
90
91
92
93
package top.withlevi.controller;

import org.springframework.web.bind.annotation.RequestMapping;
import org.springframework.web.bind.annotation.RestController;
import top.withlevi.model.User;
import top.withlevi.repository.UserRepository;

import javax.annotation.Resource;
import javax.servlet.http.HttpServletRequest;
import java.util.HashMap;
import java.util.Map;

/**
 * Created by Levi Zhao on 7/18/2023 9:39 AM
 *
 * @Author Levi
 */

@RestController
public class SessionController {

    @Resource
    private UserRepository userRepository;


    @RequestMapping(value = "/setSession")
    public Map<String, Object> setSession(HttpServletRequest request) {
        Map<String, Object> map = new HashMap<>();
        request.getSession().setAttribute("message", request.getRequestURL());
        map.put("request Url ", request.getRequestURL());
        return map;

    }


    @RequestMapping(value = "/getSession")
    public Object getSession(HttpServletRequest request) {
        Map<String, Object> map = new HashMap<>();
        map.put("sessionId", request.getSession().getId());
        map.put("message", request.getSession().getAttribute("message"));
        return map;
    }

    /**
     *  验证是否登录的页面
     * @param request
     * @return
     */

    @RequestMapping("/index")
    public String index(HttpServletRequest request) {
        String msg = "index content";
        Object user = request.getSession().getAttribute("user");
        System.out.println(user);
        if (user == null) {
            msg = "Please login first.";
        }
        return msg;

    }

    /**
     * 登录方法
     * @param request
     * @param userName
     * @param password
     * @return
     */

    @RequestMapping("/login")
    public String login(HttpServletRequest request, String userName, String password) {
        String msg = "login failure!";
        User user = userRepository.findByUserName(userName);
        if (user != null && user.getPassword().equals(password)) {
            request.getSession().setAttribute("user", user);
            msg = "Login successful.";
        }
        return msg;
    }

    /**
     * 登出方法
     * @param request
     * @return
     */

    @RequestMapping("/logout")
    public String logout(HttpServletRequest request) {
        request.getSession().removeAttribute("user");
        return "logout successful.";
    }
}
通过 JPA 的方式查询数据库中的用户名和密码,通过对比判断是否登录成功,成功后将用户信息存储到 Session 中。
我们依次启动8080端口和9090端口的项目,然后在数据库的user表中添加一个user,例如:
1
INSERT INTO `user` VALUES ('1','test@gmail.com','xiaozhao','zhao@2023','2023','Levi');
注意启动之前需要把yaml中关于JPA中 改为ddl-auto:update
首先测试 8080 端⼝口的服务,直接访问网址
1
 http://localhost:8080/index
页面返回:
1
please login first!
提示请先登录。我们将验证用户名为 Levi,密码为 zhao@2023 用户登录。
访问地址:
1
 http://localhost:8080/login?userName=Levi&password=zhao@2023
模拟⽤用户登录,返回:
1
login successful!
提示登录成功。我们再次访问地址
1
http://localhost:8080/index
返回
1
index content
说明已经可以查看受限的资源。
再来测试 9090 端口的服务,直接访问网址
1
http://localhost:9090/index
页面返回
1
index content
并没有提示请先进行登录,这说明 9090 服务已经同步了了用户的登录状态,达到了了统一登录的目的。 我们在 8080 服务上测试用户退出系统,再来验证 9090 的用户登录状态是否同步失效。首先访问地址
1
http://localhost:8080/loginout
模拟用户在 8080 服务上退出,访问网址
1
http://localhost:8080/index
返回
1
please login first!
说明用户在 8080 服务上已经退出。再次访问地址
1
 http://localhost:9090/index
页面返回:
1
please login first!
说明 9090 服务上的退出状态也进行了了同步。 注意,本次实验只是简单模拟统一登录,实际⽣生产中我们会以 Filter 的方式对登录状态进行校验. 我们最后来看一下,使用 Redis 作为 Session 共享之后的示意图:
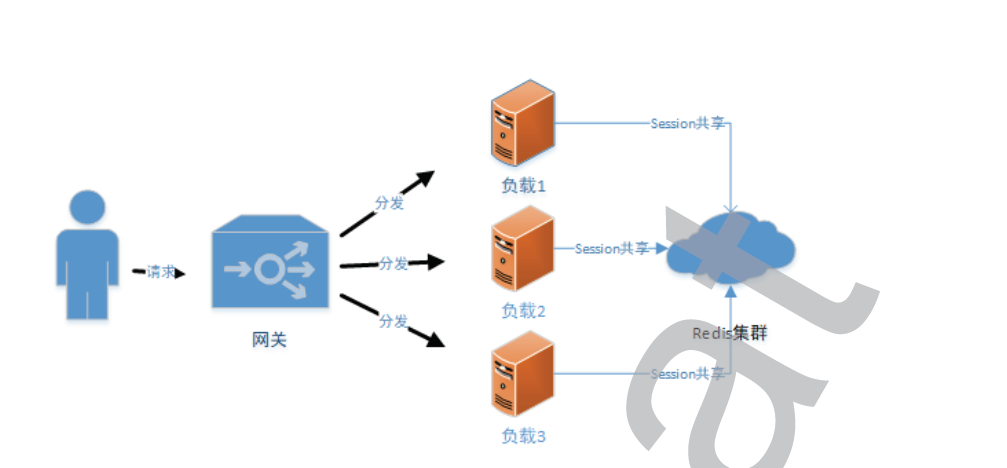
从上图可以看出,所有的服务都将 Session 的信息存储到 Redis 集群中,无论是对 Session 的注销、更新都 会同步到集群中,达到了 Session 共享的目的。
总结
在微服务架构下,系统被分割成大量的小而相互关联的微服务,因此需要考虑分布式 Session 管理,方便平台架构升级时水平扩充。通过向架构中引入高性能的缓存服务器,将整个微服务架构下的 Session 进行统⼀管理。
Spring Session 是 Spring 官方提供的 Session 管理组件,集成到 Spring Boot 项目中轻松解决分布式Session 管理的问题。